Showing posts with label PS Module. Show all posts

Saturday, January 18, 2025

Exploring Modules and Commands

Introduction

PowerShell is a powerful task automation and configuration management framework from Microsoft, consisting of a command-line shell and associated scripting language. For beginners, navigating PowerShell's vast landscape of modules, commands, and cmdlets can be overwhelming. This guide aims to simplify the process, providing a starting point for exploration and familiarization with fundamental concepts.

Understanding PowerShell Modules

Modules are self-contained units of PowerShell code that can include cmdlets, providers, functions, aliases, and variables. They provide a way to organize and distribute PowerShell functionality.

Getting Started: Finding and Installing Modules

  1. Find Available Modules: Use the `Get-Module -ListAvailable` cmdlet to see a list of modules already installed on your system.

  2. Install New Modules: Use the `Install-Module` cmdlet to install new modules from the PowerShell Gallery or other sources.

Exploring Module Contents

Once you've found or installed a module, you can explore its contents to see what commands, cmdlets, and other elements it contains.


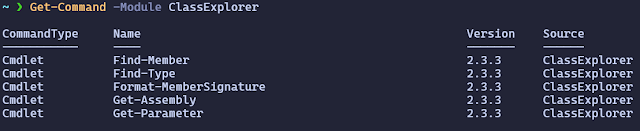
  1. Get Command: Use the `Get-Command -Module <ModuleName>` cmdlet to see a list of all commands (including cmdlets, functions, and aliases) within a specific module.

  1. Get-Help: Use the `Get-Help <CommandName>` cmdlet to get detailed help and information about a specific command, including its syntax, parameters, and examples.

Example: Exploring the `ActiveDirectory` Module

Let's say you're interested in working with Active Directory using PowerShell. Here's how you might explore the `ActiveDirectory` module:


  1. Check if Installed: Use `Get-Module -ListAvailable | Where-Object {$_.Name -eq 'ActiveDirectory'}` to see if the module is already installed.

  2. Install if Needed: If not installed, use `Install-Module -Name ActiveDirectory` to install it.

  3. List Commands: Use `Get-Command -Module ActiveDirectory` to see a list of all commands within the module.

  4. Get Help for a Command: Use `Get-Help Get-ADUser` (for example) to get detailed help about the `Get-ADUser` cmdlet.

Key PowerShell Concepts

As you explore modules and commands, keep these fundamental PowerShell concepts in mind:


  • Cmdlets: These are the core commands in PowerShell, following a Verb-Noun naming convention (e.g., `Get-ChildItem`, `Set-Location`).  The words “Commands” and “cmdlets” are sometimes used interchangeably, but a cmdlet is a compiled script ready for use in a session (if imported) and a command, is a function call with the Verb-Noun pattern, like “Get-Process”.

  • Objects: PowerShell works with objects, which have properties (characteristics) and methods (actions).  

    • Powershell commands ALWAYS produce objects as output.  Even the use of ‘Out-String’ sends a string object to the console output.  This highlight is critical to understanding what PowerShell does underneath the hood.  You can use the -Verbose command to see what some of the internals are doing, but the concept of returned objects is applied in all cases.

  • Pipelines: You can use the pipe symbol (`|`) to chain cmdlets together, passing the output of one cmdlet as input to the next.  

    • Powershell objects returned by the pipeline are like excel rows and columns.  An object is like a row in the sheet, and each column in the sheet is essentially a property of the object.  By referring to the property names, you can access their contents.  Structured data output, that is, objects, are at the deep core of what Powershell is.

  • Providers: These allow you to access data stores (like the file system, certificates or the registry) as if they were drives.  Since the PSProviders are built-in, we can use the Get-ChildItem, for example, on any of the providers using the -Path parameter as shown:

    • File System:  Get-ChildItem -Path C:\temp\ -Recurse

    • Registry (Current User Hive):  Get-ChildItem -Path HKCU:\Software\

    • Certificates:  Get-ChildItem -Path Cert:\LocalMachine\My 

Conclusion

By exploring PowerShell modules and commands, you can gradually build your understanding of this powerful tool and its capabilities. Remember to use the `Get-Command` and `Get-Help` cmdlets to discover and learn about new cmdlets, and don't be afraid to experiment and try things out.


Installation differences in PowerShell Versions


Getting Versioning Clarity

PowerShell and Windows PowerShell are separately installed and you can run supported commands using either environment.

There are two versions of Powershell:

  1. Windows PowerShell - Windows PowerShell is available exclusively for the Windows OS.   All versions of Windows PowerShell up to and including 5.1, which is the version available with Windows 10, are integrated with a Windows OS.

  2. PowerShell - PowerShell is shipped, installed, and configured separately from Windows PowerShell.  First released as PowerShell Core 6.0 in 2018, it was the first version that offered multi-platform support, extending its availability to macOS and Linux operating systems.  However, PowerShell 7 is the defacto for cross-platform scripting in PowerShell with v6 retired.


Installation differences in PowerShell Versions

Installing the latest version of PowerShell results in the following when compared to Windows PowerShell:

  • Separate installation path and executable name.

    • Windows PowerShell 5.1 is installed in the $env:WINDIR\System32\WindowsPowerShell\v1.0 location.

    • PowerShell 7 is installed in the $env:ProgramFiles\PowerShell\7 location.  The new location is added to your PATH, which allows you to run both Windows PowerShell 5.1 and PowerShell 7.

    • In Windows PowerShell, the PowerShell executable is named powershell.exe.

    • In version 6 and newer, the executable is named pwsh.exe. The new name makes it easy to support side-by-side execution of both versions.

  • Separate PSModulePath. By default, Windows PowerShell and PowerShell 7 store modules in different locations.  PowerShell 7 combines those locations in the $Env:PSModulePath environment variable.  

    • When you import a module by name, PowerShell checks the location that $Env:PSModulePath specifies.  This feature allows PowerShell 7 to load both Core and Desktop modules.

  • Separate profiles for each version. A PowerShell profile is a script that runs when PowerShell starts.  This script customizes the PowerShell environment by adding commands, aliases, functions, variables, modules, and PowerShell drives.

    • In Windows PowerShell 5.1, the profile's location is $HOME\Documents\WindowsPowerShell.

    • In PowerShell 7, the profile's location is $HOME\Documents\PowerShell.

  • Separate event logs. Windows PowerShell and PowerShell 7 log events to separate Windows event logs (if using a Windows Server or PC).


When you're reviewing a PowerShell session, it's important to determine which version you're using.  To determine the current version, enter $PSVersionTable in the PowerShell console, and then select Enter.  PowerShell displays the version numbers for various components, including the main PowerShell version number.


PowerShell and Bit-ness

  • On 64-bit operating systems, the PowerShell host applications are available in both 64-bit (x64) and 32-bit (x86) versions.

  • On 32-bit operating systems, PowerShell’s host applications are available only in 32-bit versions.  When working with Windows PowerShell, you'll notice that the icons and window title bars don't have the (x86) designation.  Instead, they display simply as Windows PowerShell and Windows PowerShell ISE in the Start menu.

  • If you intend to use PowerShell to perform administrative tasks on computers that have User Account Control (UAC) enabled, you might have to take an extra step to run PowerShell cmdlets with full administrative credentials.  To do this, right-click or activate the context menu for the application icon, and then select Run as Administrator. When you're running PowerShell with administrative credentials, the host application’s window title bar will include the Administrator prefix


Saturday, January 04, 2025

How To Write a PowerShell Portable Function

How to Write Reusable PowerShell Functions

1. Script Modules (.psm1)

  1. Create a module file:
  1. Create a new file with a `.psm1` extension (e.g., `MyFunctions.psm1`).
  2. Write your function:  Inside this file, define your function:

#PowerShell
function Get-MyThing {
   
# Function code here
}

  1. Save the module: Save the file in a directory that PowerShell can find. Common locations include:
  1. `$env:USERPROFILE\Documents\WindowsPowerShell\Modules\`
  2. `$env:PSModulePath` (system-wide modules)
  1. Import the module: In your other scripts, import the module using:

#powershell
Import-Module MyFunctions

  1. Use the function: You can now call `Get-MyThing` in your scripts.

2. Script Files (.ps1)

  1. Create a script file: Create a new file with a `.ps1` extension (e.g., `MyFunctions.ps1`).
  2. Write your function:  Define your function within this script file.
  3. Dot source the script: In your other scripts, use the dot sourcing operator (`.`) to load the functions:

# PowerShell
. .\MyFunctions.ps1

  1. Use the function: You can now call your function.

3. Module Manifests (.psd1)

Use a module manifest for more complex modules with multiple functions and dependencies. This is a file with a `.psd1` extension that describes the module's contents, version, and other metadata.  The `New-ModuleManifest` cmdlet can generate a basic manifest file.

Best Practices

  • Verb-Noun Naming: Use approved verbs (get, set, new, etc.) and descriptive nouns for your function names (e.g., Get-DiskSpace).
  • Parameters: Use parameters to make your functions flexible and reusable in different situations.
  • Comment-Based Help: Add comment-based help to your functions to provide documentation.
  • Error Handling: Use try-catch blocks to make your functions robust.
  • Output: Consider what your function will output. Raw data is generally preferred for functions, so it can be piped to other commands.

Example with Parameters and Help

PowerShell

<#
.SYNOPSIS
Gets the free disk space on a computer.

.PARAMETER ComputerName
The name of the computer to check.

.EXAMPLE
Get-FreeDiskSpace -ComputerName "MyServer"
#>

function Get-FreeDiskSpace {
   
param(
       [string]
$ComputerName = "localhost"
   )

   
try {
       
Get-WmiObject Win32_LogicalDisk -ComputerName $ComputerName |
           
Where-Object {$_.DriveType -eq 3} |
           
Select-Object DeviceID, @{Name="FreeSpaceGB";Expression={$_.FreeSpace / 1GB}}
   }
   
catch {
       
Write-Error "Failed to get disk space: $_"
   }
}

By following these guidelines, you can create well-structured, reusable PowerShell functions that will improve the efficiency and maintainability of your scripts.